Help
Step-by-step guides for everything you do in Tectra, from installing it to the progress report.
Guide 1
Install and first start
Get Tectra running and create your company database.
Download the installer from the Download page. We email you the link.
Windows: run the .exe. If "Windows protected your PC" appears, click More info, then Run anyway. macOS: drag Tectra to Applications, then right-click it and choose Open the first time.
On first start, Tectra asks for your company. Type its name. Tectra creates a database for that company on your computer.
Then open your model (File › Open IFC) and import your programme (File › Import). The guides below take you through each step.
Each company has its own folder: %APPDATA%\Tectra on Windows, ~/Library/Application Support/Tectra on macOS. Use the company button in the top bar to switch company or back up the database.
Guide 2
Create, save and open projects
Keep everything for one job in one project.
Click File › New to start an empty project.
Press Ctrl+S (or File › Save) to save the programme, links, views and settings, with copies of the models, in the company database. Shift+click Save to save a copy under a new name.
Click File › Open to reopen a saved project. It opens with its models in seconds.
To send a project to a colleague, export it as a
.tectra.jsonfile and open it on their computer with File › Open.
Guide 3
Open IFC models
Bring in architecture, structure and services.
Click File › Open IFC and choose one or more .ifc files, or drag them onto the window.
Large models load in the background. The status bar shows the element count when they are ready.
Open the Model tree (3D tab) to browse by storey, type and system, and Properties to read the property sets of the selected element.
Use 3D › Selection sets for sheets, levels and worksets, and Hide, Isolate and Show all to control what you see.
IFC2x3 and IFC4 are supported. Export with your project base point or shared coordinates so all disciplines line up.
Guide 4
Export from Revit with the add-in
One click from Revit, with sheets, levels and quantities.
The Tectra add-in installs with Tectra for Revit 2022 to 2027. Restart Revit after installing.
In Revit, open the Tectra ribbon tab and click Export Settings. Choose the views, the parameters you want and the IFC options, and save.
Click Export to Tectra. The add-in writes the IFC model and a matching
.tectra.jsonfile next to it.In Tectra, open the IFC first, then drop the
.tectra.jsonfile on the window. Sheets, levels, worksets, materials and quantities are added to the model.
Guide 5
Import the programme
Use the programme you already have.
Click File › Import and choose the file: Primavera P6 (.xer or .xml), Microsoft Project (.mpp or .xml), Asta Powerproject (.pp), Excel (.xlsx) or CSV.
Check the import summary. Activities, WBS, logic, actual dates, percent complete, calendars, codes, resources and costs come in where the file has them.
For Excel or CSV, Tectra reads the column headings for you. Extra columns become activity codes you can filter and link by.
No programme yet? Click Plan › Add task to build one in Tectra, then Link tasks to connect them.
Guide 6
Plan in Tectra Planner
A full planning window, linked live to the 4D view.
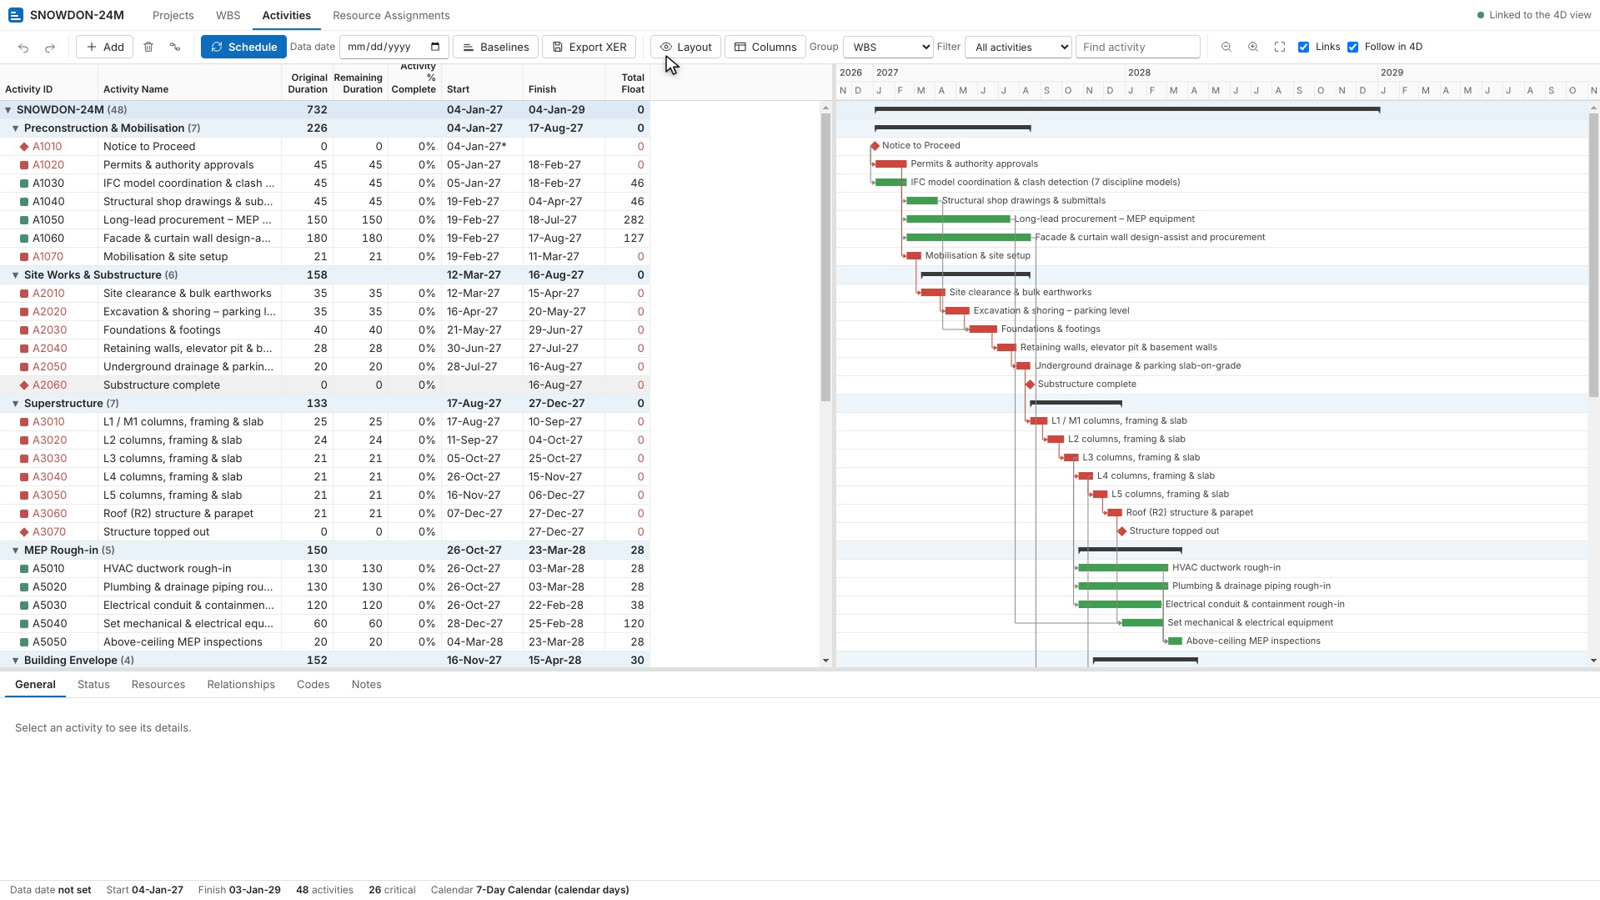
Click Plan › Planner to open Tectra Planner in its own window.
Edit activities in the table, organise them in the WBS window, and set relationships and constraints in the details tabs.
Press F9 to schedule. Tectra works out dates, total float and the critical path from the logic and calendars.
Click Set baseline before work starts, so progress can be measured against it later.
When you are done, use File › Export XER to take the programme back to Primavera P6.
Selecting an activity in Tectra Planner highlights its elements in the 4D view, and the other way round.
Guide 7
Set calendars and holidays
Plan with the working week your sites use.
Click Plan › Calendars.
Pick the work week, such as Monday to Friday or Sunday to Thursday, and the hours per day.
Add holidays one by one, as date ranges, or paste a list.
Click Plan › Reschedule to move tasks to fit the calendar and their links.
Calendars from a P6 programme come in with it.
Guide 8
Link the model to the programme
Auto-link thousands of elements, then review.
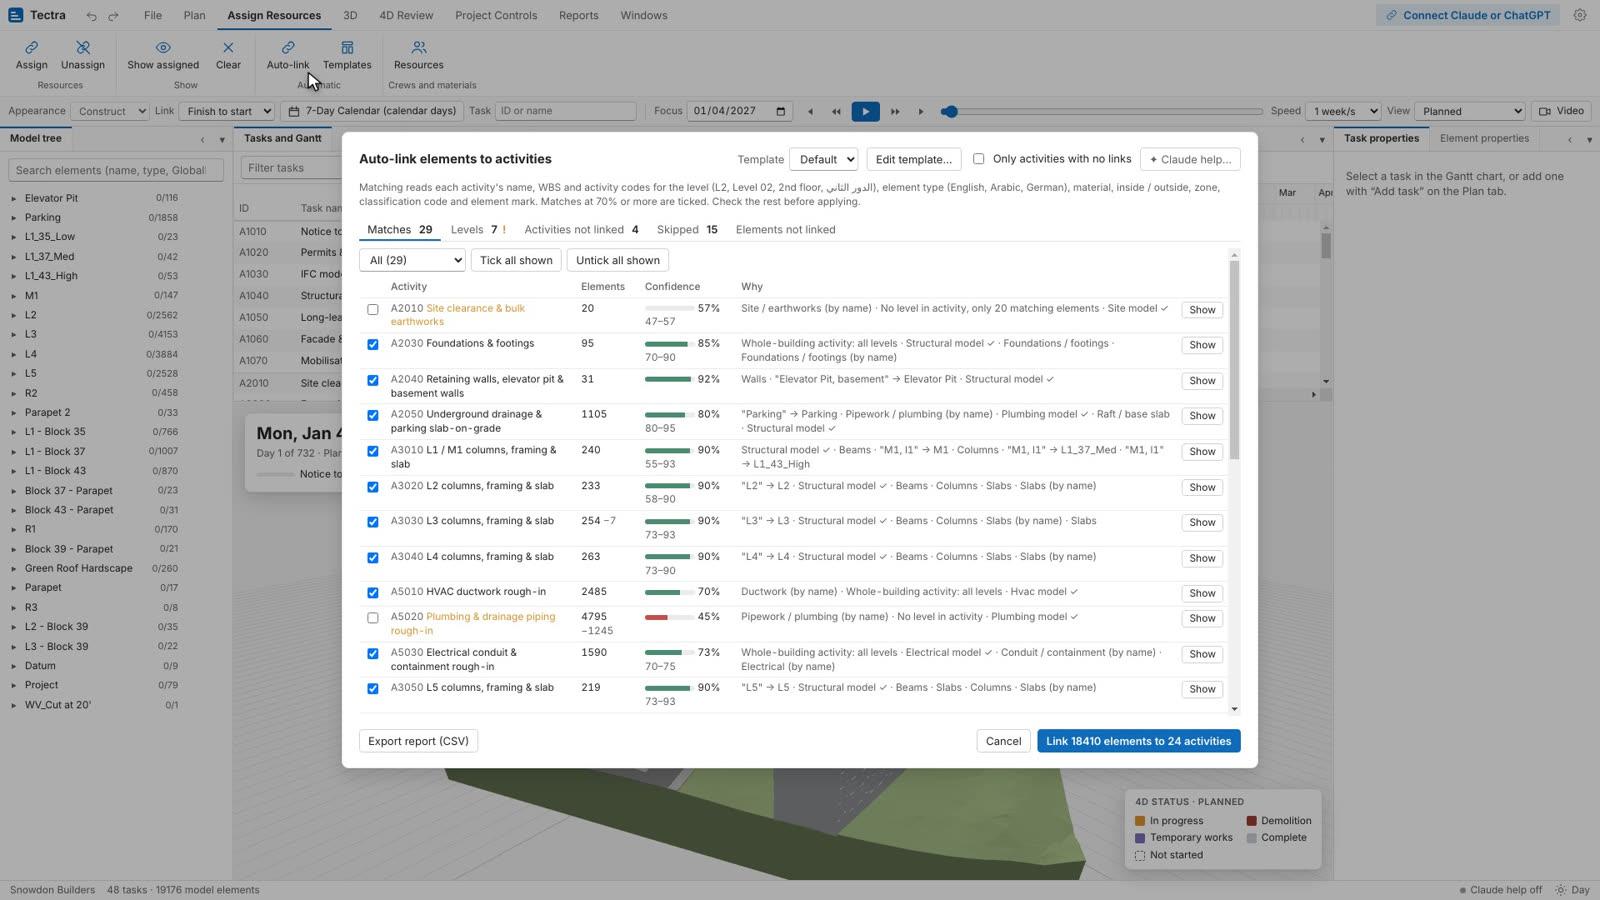
Click Assign Resources › Auto-link. Tectra reads levels, element types, materials, zones, codes and marks in activity and element names.
Check the review screen. Each match has a confidence score and the reason. Untick anything wrong.
If a level is read wrongly, fix it once in the Levels tab. Tectra remembers it.
Click the button at the bottom to link the ticked elements. Save the rules with Templates to reuse them on your next project.
For anything left over, select elements in 3D, select the task, and click Assign. Show assigned selects what a task already has.
The report lists activities and elements that are still not linked, so nothing is missed.
Guide 9
Play the 4D sequence
Watch the project being built.
Open the 4D Review tab and click Planned.
Press Play (or the Space bar). Use the slider in the quick bar to move to any date, and the speed setting to go by day, week or month.
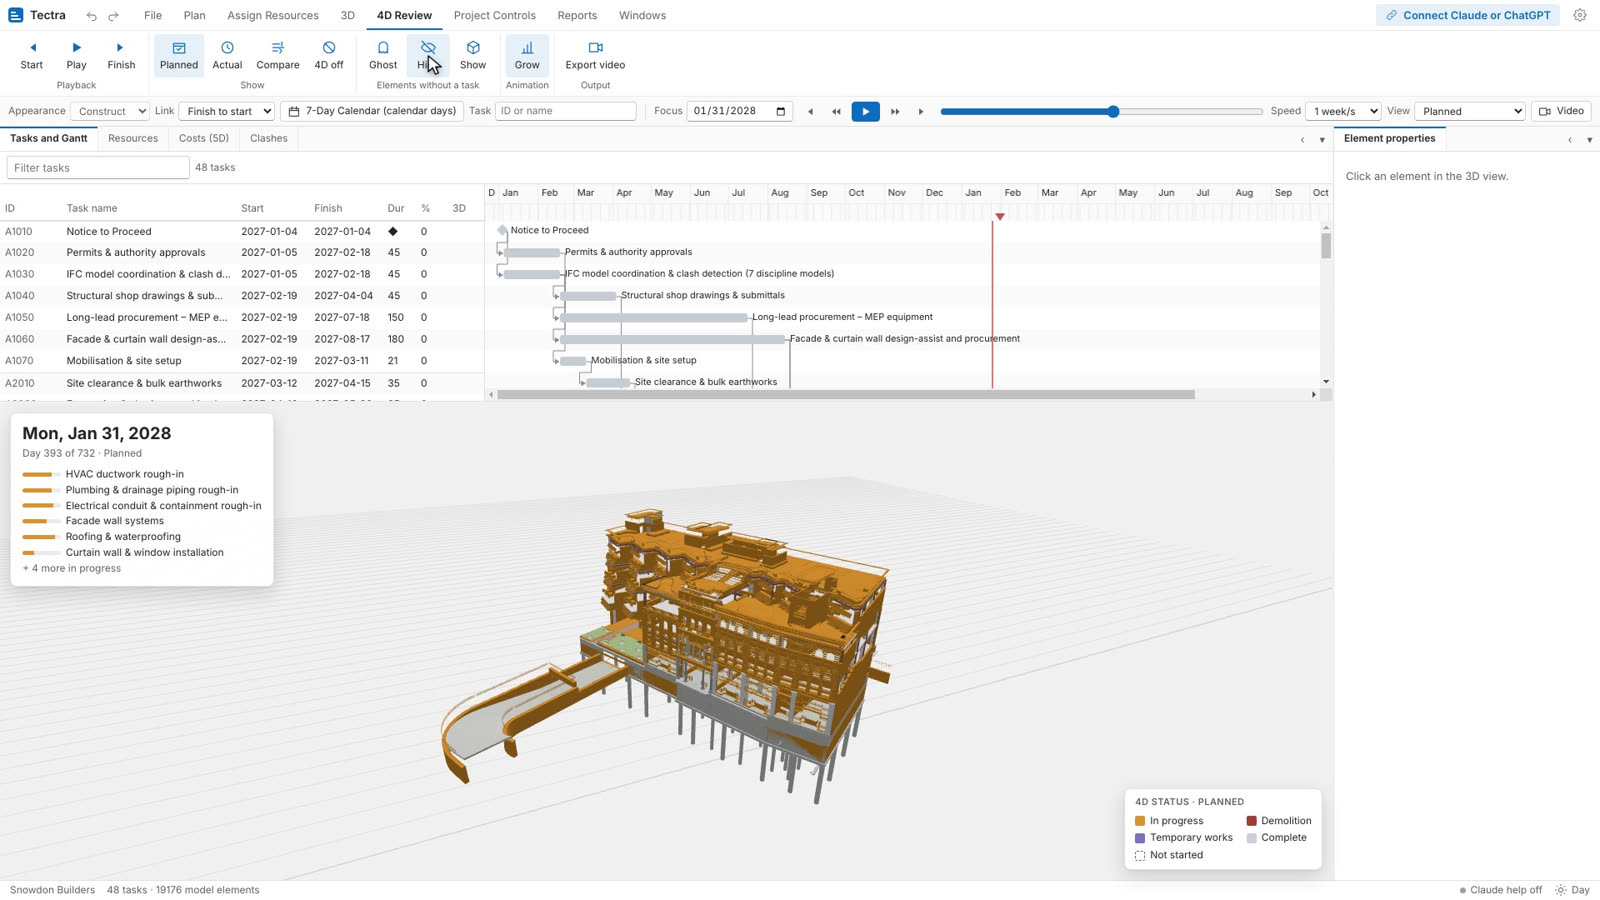
Choose how to show elements without a task: Ghost, Hide or Show. Turn on Grow to build elements upward while their task is under way.
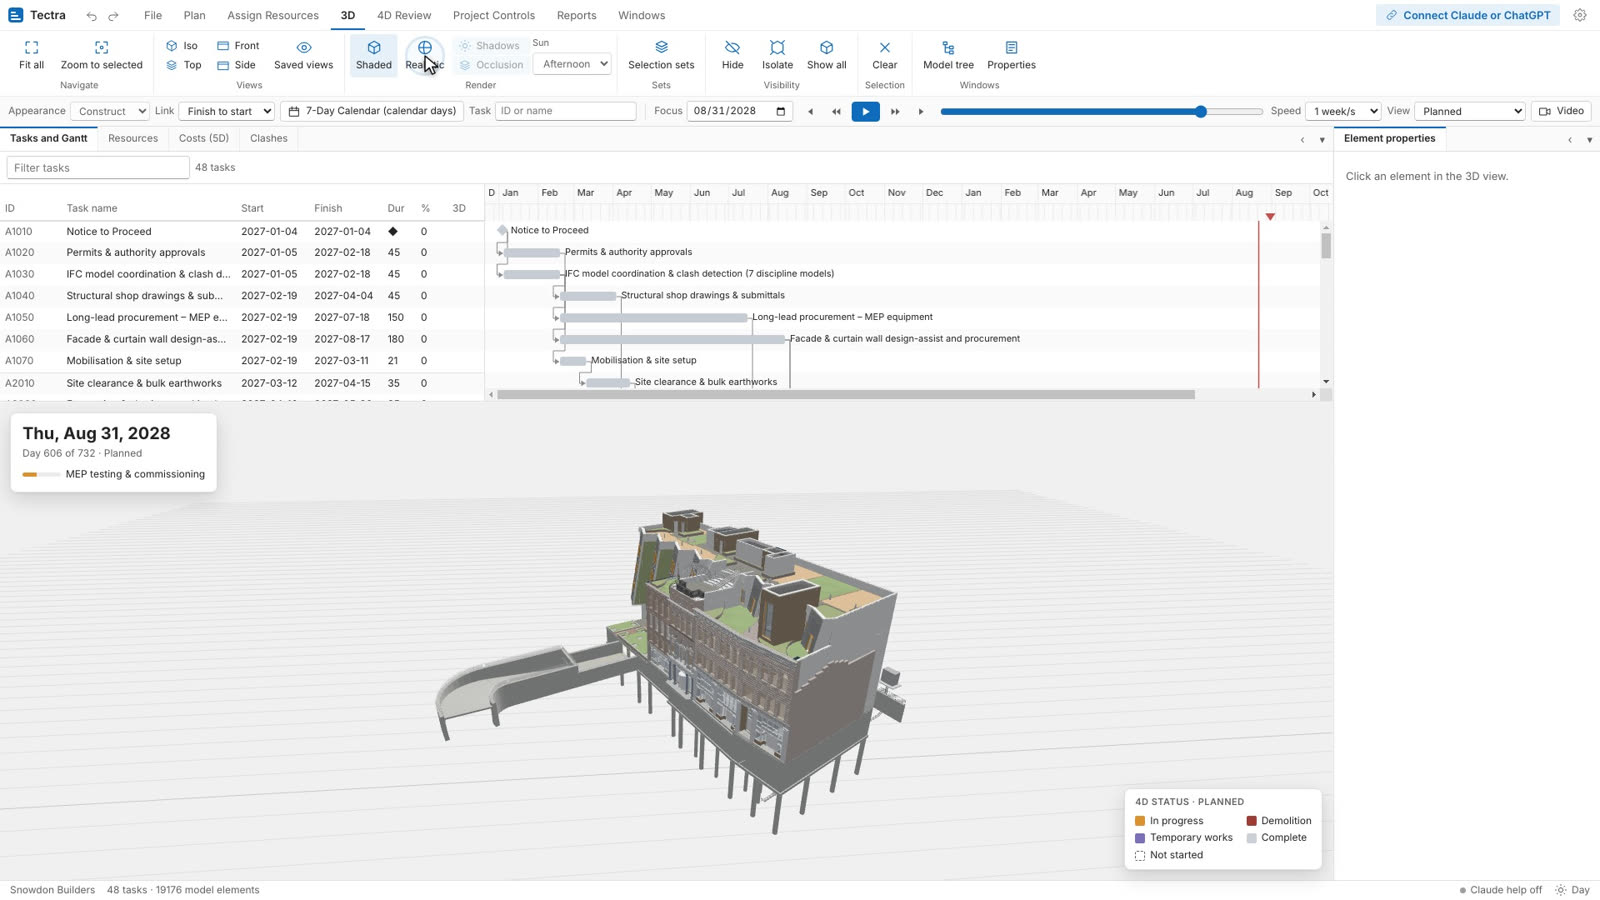
For presentations, click 3D › Realistic and pick the time of day for the sun.
Guide 10
Update progress and compare with the plan
See what is ahead, on plan or late.
Set the baseline first (Plan › Set baseline), if it isn't in the programme already.
Each period, import the updated programme with File › Import. Links to the model are kept. Or enter actual dates and percent complete in Tectra Planner.
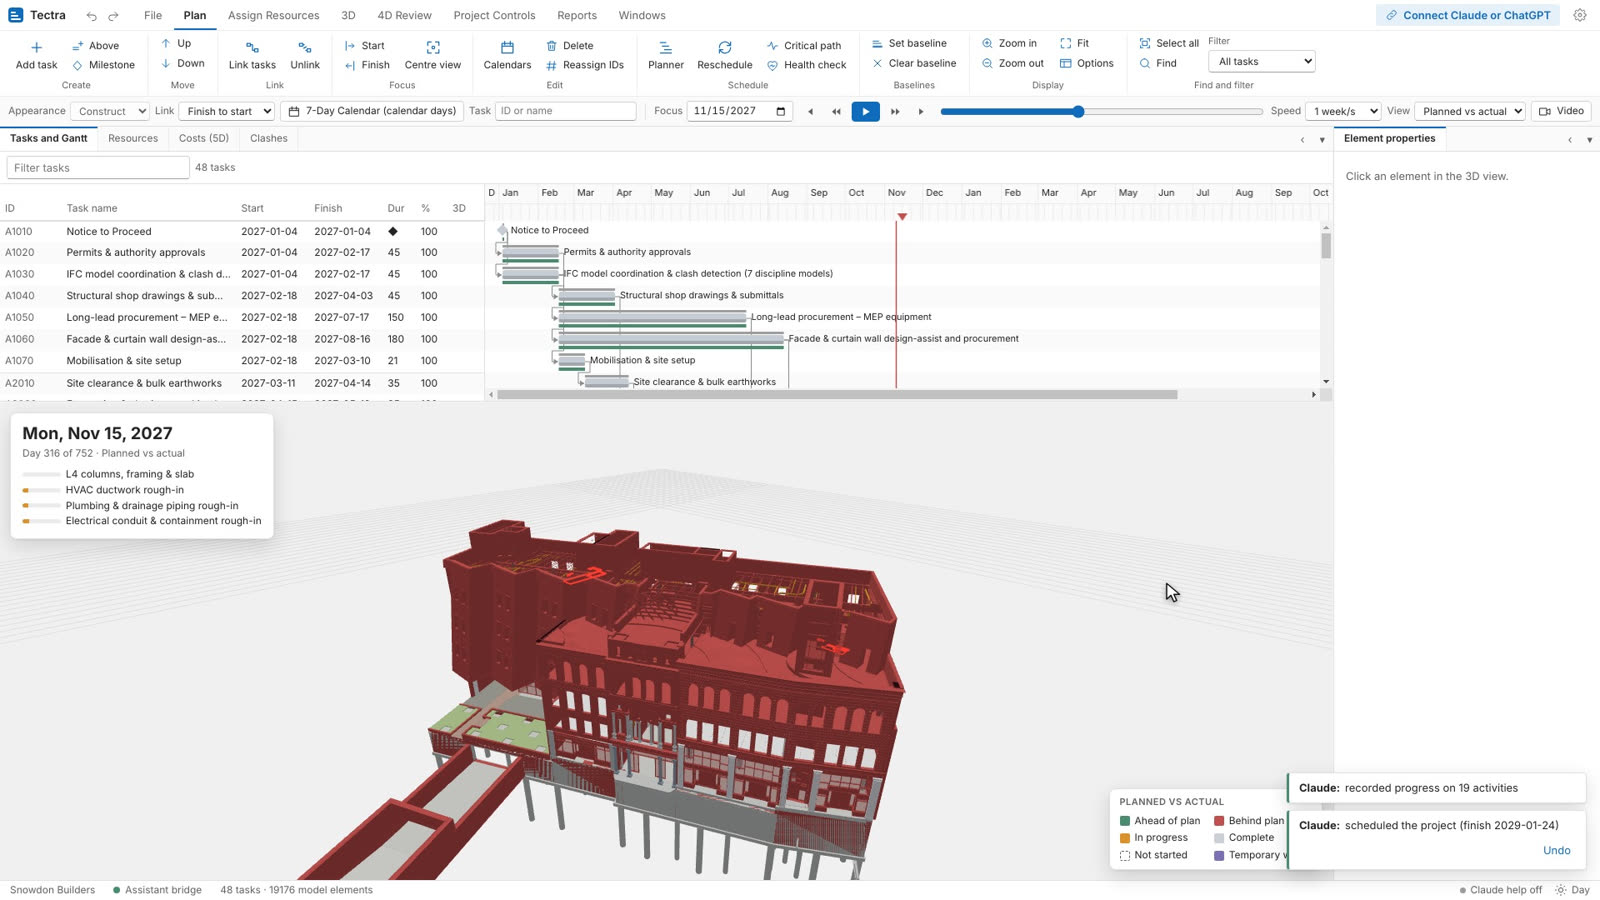
In 4D Review, click Compare. Elements are coloured ahead, on plan or behind at the data date, and late work shows in red.
Click Reports › Progress report for the summary: percent planned and actual, schedule performance, forecast finish and the late activities.
Guide 11
Add resources and quantities
Plan crews, equipment and materials.
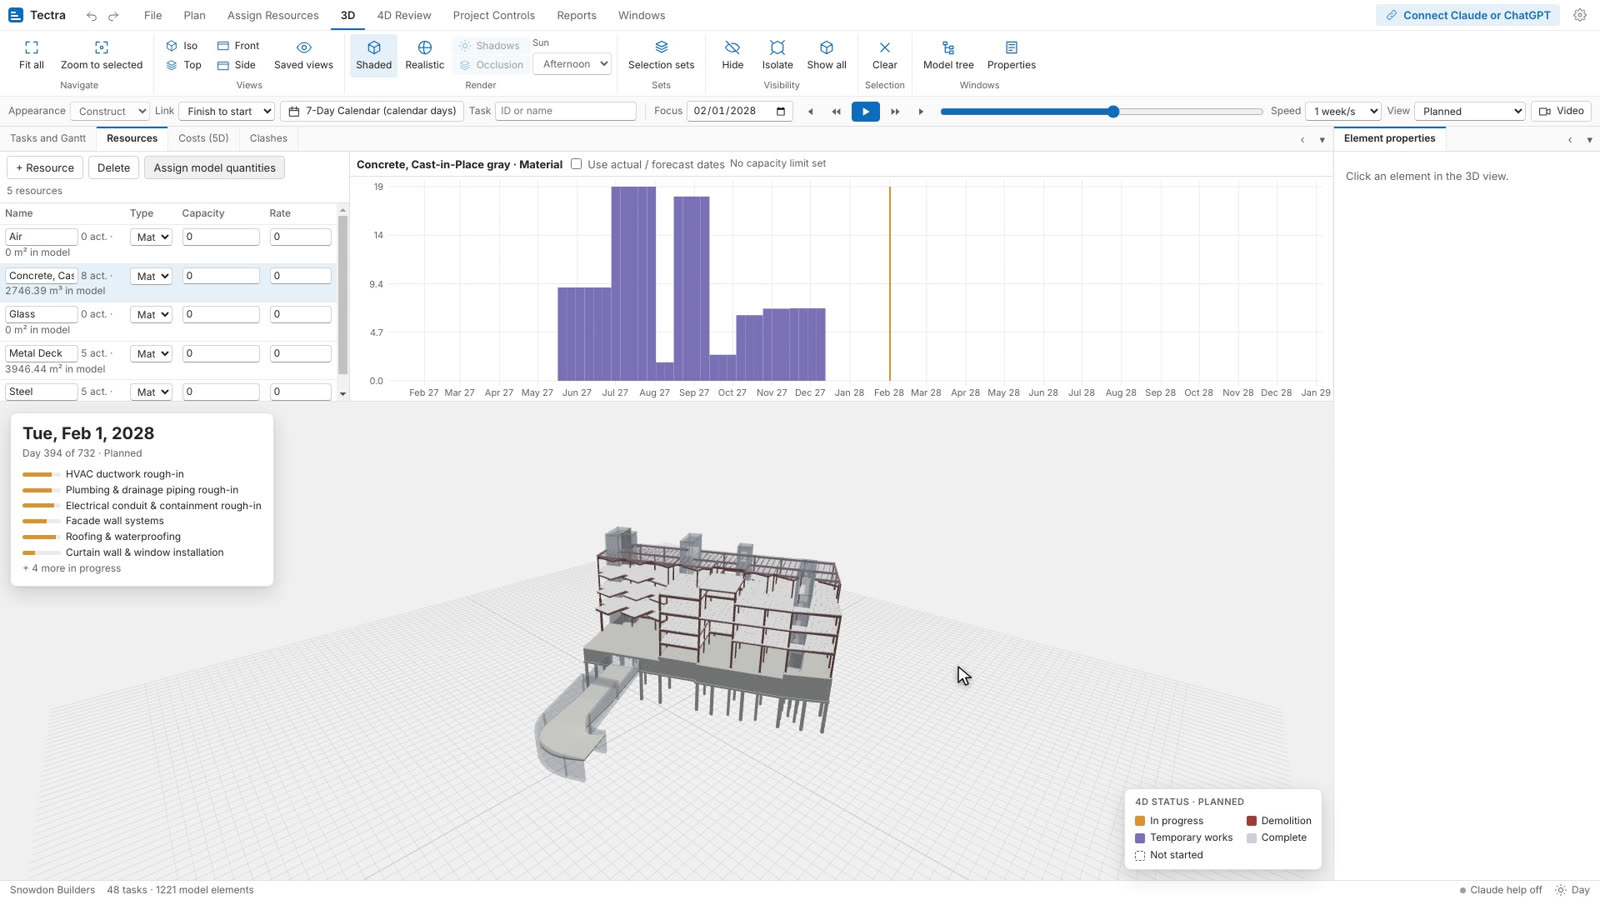
Open Assign Resources › Resources.
Add labour, equipment and material resources with their capacity and rate.
Assign them to activities. Quantities from a Revit model can be assigned to the linked activities and are spread over each activity's duration.
Read the histogram per resource. The line shows capacity, so you can see where the plan needs levelling.
Guide 12
Costs and earned value (5D)
Budget, progress and cash flow from the same programme.
Give resources a rate, or add fixed costs to activities.
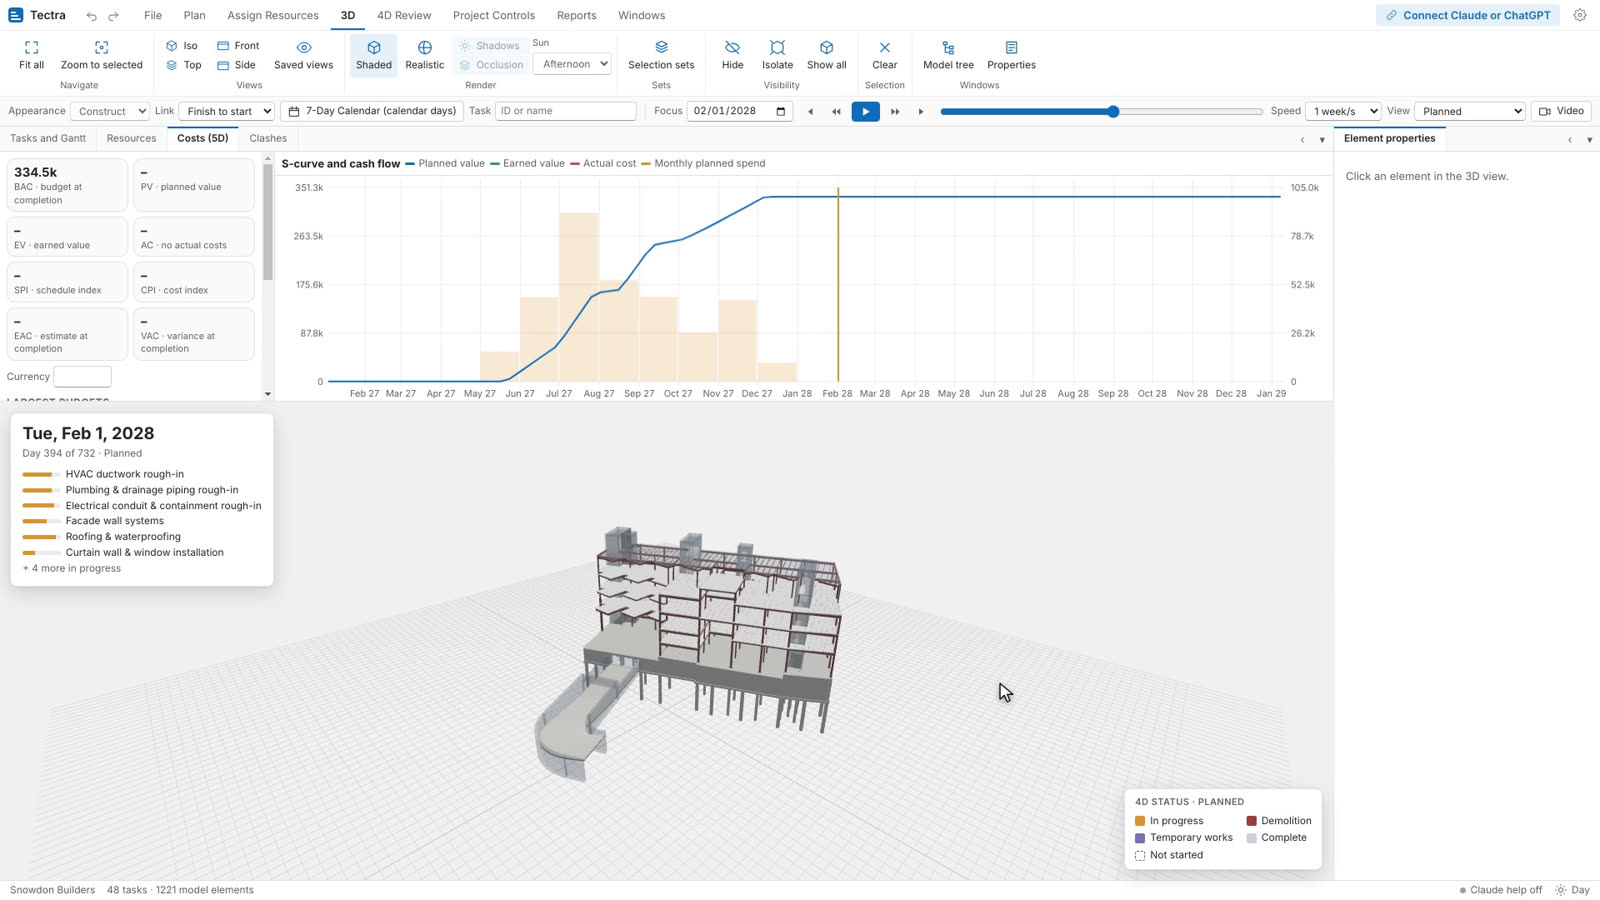
Open Project Controls › Costs to see the budget per activity, planned value, earned value and actual cost.
Read SPI, CPI, EAC and VAC at any date, with the S-curve and monthly cash flow.
Guide 13
Find clashes over time
Catch two activities in the same place at the same time.
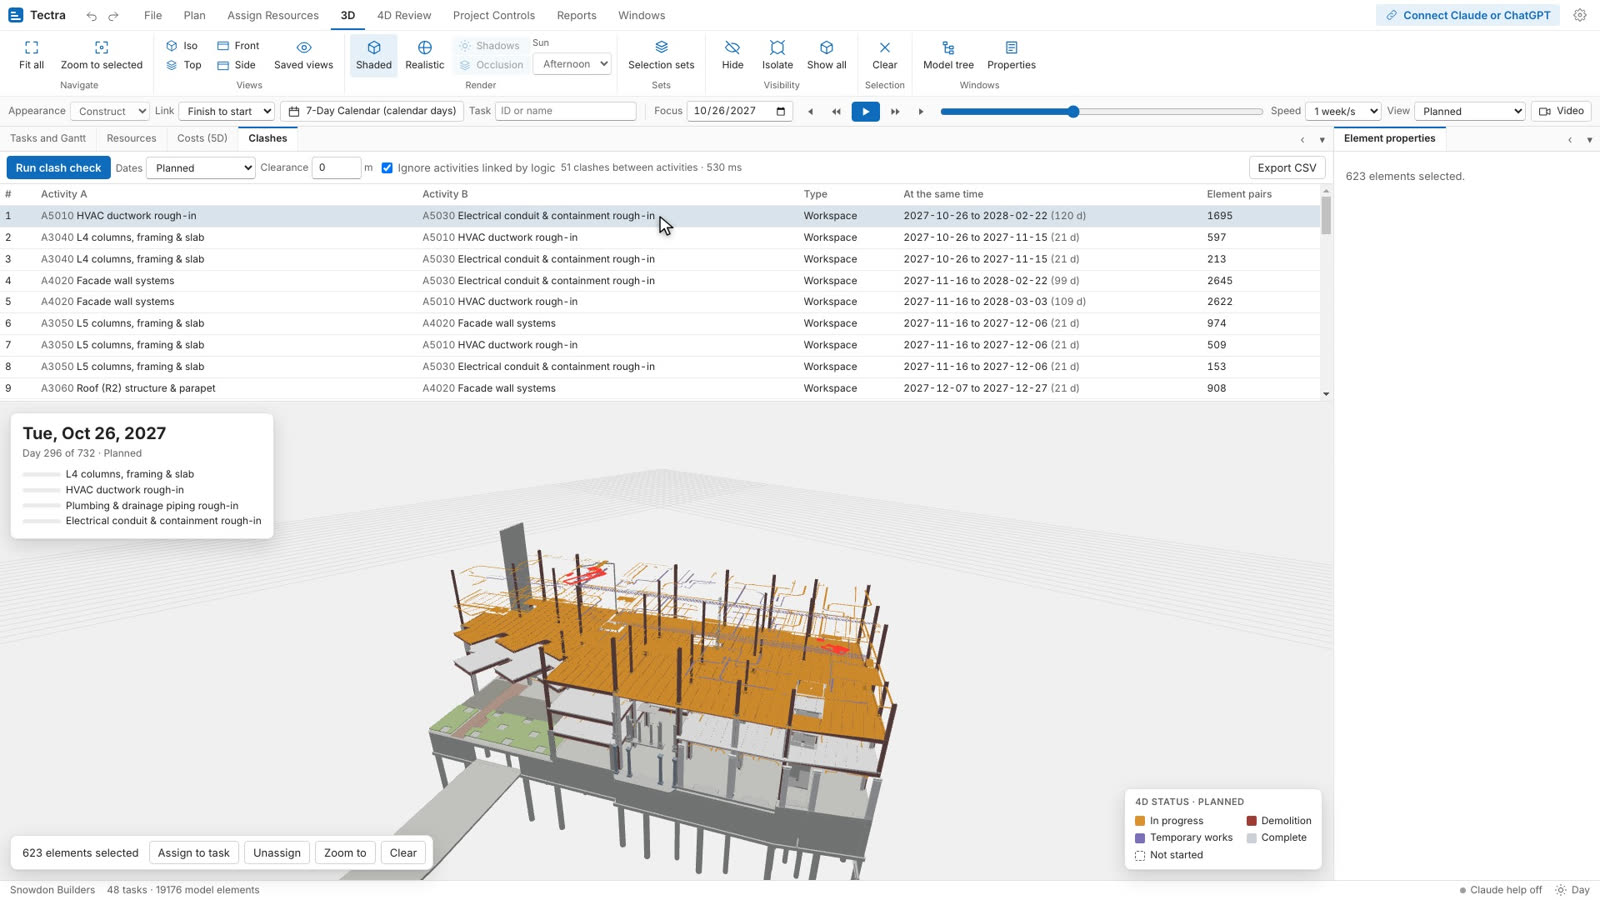
Open Project Controls › Clashes and run the check.
Tectra lists activities that overlap in time and whose elements, workspaces or temporary works overlap in space. Set a clearance if you need one.
Click a clash to jump to its date and zoom to the elements.
Model cranes, scaffolds and laydown areas as temporary works or workspaces, so they are checked too.
Guide 14
Export a video
A clear progress video for clients and meetings.
Set up camera positions with 3D › Saved views, or use an orbit around the model.
Click 4D Review › Export video.
Choose the date range, speed, camera path and quality: HD, Full HD or 4K. The date and progress are shown on screen.
Save the MP4 and share it.
Guide 15
Claude help and assistants
Optional help, using your company's own key.
Claude help is off until you turn it on. Click File › Settings and add your company's Claude API key, with a monthly limit.
Auto-link can then suggest links for activities the rules could not place, and the progress report can include a written review.
To let Claude, ChatGPT or another assistant work in Tectra for you, click Connect Claude or ChatGPT in the top bar and follow the steps. Every change it makes is shown and can be undone.
The key is encrypted on your computer. Only the text needed for each request is sent, under your company's own account.
Guide 16
Layout, shortcuts and help
Make Tectra work the way you do.
Drag windows to dock them where you like. Windows › Reset layout puts them back.
Switch between Day and Night mode in the Windows tab.
Shortcuts: Ctrl+S save, Ctrl+Z undo, Ctrl+Y redo, Space play or pause, F9 schedule, Esc clear the selection.
Something not working, or an idea? Tell us on the Feedback page.
Try Tectra on your next project
Free for Windows and macOS. Bring your own model and programme.